Wednesday, December 23, 2015

The Idea...

How to put this:


In this:


Using this:


Read on to see how we did!


Finally Done!

After three months of heat, sweat, stress, and spending, we could call our bath renovation complete:


And a little victory dance:


Thanks for stopping by!

Finish Line in Sight!

Finishing tile freed us to install plumbing fixtures, light switch covers, shelving, sinks, etc... all the fun stuff we picked out when we started planning this project.

First we installed the new toilet, which had been waiting patiently in the sun room for the last few months.  Above that went shelving - we opted against cabinets or closets for the new design since the space was so small.  This force us to be selective with what we chose to keep in the bathroom, but also guaranteed clutter would be kept to a minmum.


We finally chose some Kohler hotel shelves.  They were the only chrome plated ones we could find that fit our design - and budget (ignore the temporarily crooked middle one!):


Next came the sink.  As mentioned earlier, we had to develop a very unconventional way of mounting the faucet, as it was meant to be concealed in a wall instead of mounted to the back of a porcelain sink.  The result was that the valves had to be set half way outside the face of the wall on a 2x6 ledge, with the supply lines running through the 2x6.  Worse, everything again had to be PERFECTLY level and centered on the sink brackets, tile coursing, etc., or nothing would look right when we put it all together.

Faucet valve, sink brackets, and chrome shutoff valves.  And shower glass beyond too!:


We tried a few dry fits first and adjusted the placement accordingly until we got the faucet where we were happy with it on the sink.  Measure twice, cut once, and everything comes together!

Time to connect mixing valves to faucet.  In the spirit of exposed plumbing and spending money, we picked up some chrome plated rigid copper supply lines and started bending.

Slowly!  One curve at a time to prevent kinks:


One down:


Two down!  It took a few tedious hours to get two identically curved tubes, but the result was worth it:


A bit of tightening and it was time to test:


Success at last!  Time to put in the sink and close that chapter:


Sink hung, mirror in, toilet in, glass up!  Next up: the finished product...

Tuesday, December 22, 2015

Waterproofing, Tile, and Chrome

Things are getting fun!  Done with drywall and cement board, now it's time to apply waterproofing to the shower.


This is Redgard, available by the gallon at Home Depot.  It's expensive, but very easy to use and can be tiled directly over.  Goes on with a roller or brush, about the same consistency as mayonnaise.


That last image showed Redgard on the shower floor as well.  We ended up having to pull that back up (fun!).  Apparently it isn't meant for application over fresh concrete and did not stick.  Peeling it off in quarter size pieces was a total pain, but it beats having your tiles popping off the floor!

After a little more wall preparation, we were FINALLY ready to tile! We spent a few hours drawing all our guidelines on the walls (we knew exactly how we wanted the tile coursing to lay out) and go to it.  We designed the new bath with tile on all four walls to about the 7' line with a bit of trim at the top, so we had a lot of work to do.  Luckily it goes pretty quickly, and using a tile saw is therapeutic.


First wall going up.  This felt really good.


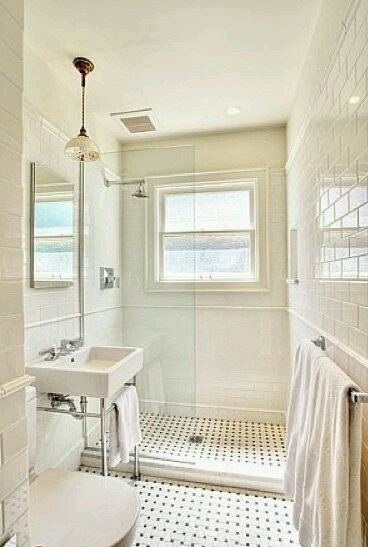
Tiling around the recessed medicine cabinet and wall hung sink.  The sink was a huge pain from start to finish.  We had to install the wall clips on the wall perfectly level, because any variation at all would be evident against the straight lines of the tile.  We also bought a faucet that wasn't meant to be used on a sink, but rather installed in the wall for a bowl style vessel.  It worked, but took forever to design and implement.


Dad tackled the entire floor during our weekdays at work.  It looked amazing!


Wall tile nearing completion:


Shower niche and the start of our detail banding:


Temporary shower curtain and rod while our glass was being fabricated:


Installing the last trim band:


This was actually a gamble on our part that paid off.  We liked the look of decorative tile banding, but couldn't justify the cost to run the band all the way around the room at around $15 per foot.  Instead we sourced some elaborate wood moulding and painted it with color matched paint we had custom made.  It looked exactly how we wanted!

Close-up of some of our new chrome bits:


We're very happy with how the sink turned out, however EVERYTHING on it was expensive thanks to our love of exposed chrome hardware.

Little memento in the wall before installing the mirror.  You can still see the side-mounted outlet for our toothbrushes in the cabinet:

.

Placing the medicine cabinet.  Another expensive purchase from Kohler, all because we didn't want one with a beveled mirror:


Getting close...


And our new rain head so we could finally shower in our own home for the first time in months!


Next up: finishing touches and final shots!

Monday, December 21, 2015

Drywall, Cement Board, and Building a Shower Pan

Dust and drywall!  With framing, plumbing, and electrical FINALLY done, we were ready to enclose the walls.  Things finally began to feel less like a war zone and more like a room in progress.


Cutting the cement board for the shower walls:


This dust got everywhere.  Wear clothes you're ready to throw away. 


We did hit a snag while hanging drywall.  Regardless of how hard we tried to thoroughly map out where all of our new wiring and water lines were (and there were dozens), we still managed to screw through the center of one of our supply lines. 


We took down that sheet, threw some tools around in frustration, and made the repair. We then marked where that line was AGAIN and rehung drywall.  Great mistake to only make once!

Next we framed and poured the concrete shower pan.  As part of our goal of maximizing our space, we decided to have a shower instead of a tub.  It was the right move.

Framing the curb:


Laying out the pan liner.  This was an important step not to mess up, as the tiniest puncture in the pan liner would allow water onto the new plywood subfloor and joists to begin rotting again.


Pan is in place, edges expertly folded like a Christmas gift:


We never thought to buy the plug to test the pan, and most hardware stores don’t sell them because they know EVERYONE uses it once and returns it.  At first we tried to improvise:

Balloons didn't work:


Condoms didn't work: 


We ended up waiting until Monday for the plumbing supply store to open.  Ate the cost of the drain plug, and everything worked perfectly.  If anyone’s building a shower pan let us know!  We have the plug.


Mixing cement for the pan: 


Fine tuning the slope:


Ready to dry - do not touch!


Letting it dry for a while:


Shower drain:


Next up is waterproofing, to ensure all our hard work doesn't go to waste!